Custom watermark
Watermarks help protect your maps against misuse or serve as a means of brand promotion. You can include a custom watermark in a MapTiler map using Map Designer.
Prepare custom watermark
When preparing your watermark image, keep these technical limitations in mind:
- Your image must have transparent background.
- Size is currently limited to max 256×256 px.
- Format can be PNG or SVG, but SVG must be converted to raster during upload.
Other requirements are the same as for standard icons. See 👉 how to prepare custom icons.
Upload watermark image
Watermark is currently treated as a special type of icon. You’ll upload it via our icon sets management:
-
Open the Map Designer.
-
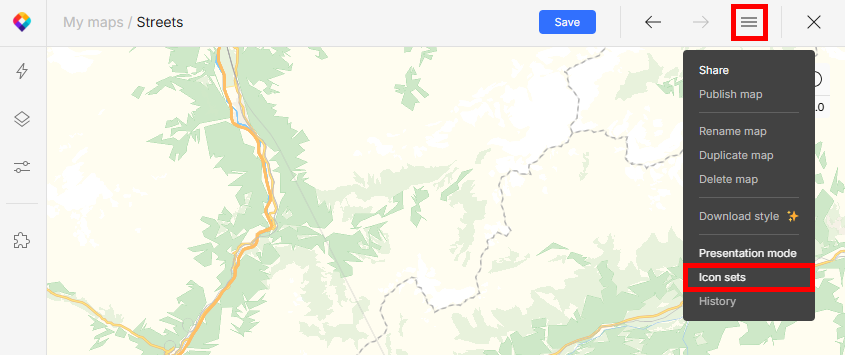
Open the “hamburger” menu and click Icon sets.
-
Click the plus button to create a new custom icon set. You can also add your watermark image to an existing non-customizable (raster) set.
-
Click Add icons. Upload your raster watermark image (PNG). For vector input, see special instructions below.
Uploading SVG
If you’re uploading your file in vector format, you MUST convert it to raster during upload. Vector images are not usable due to the underlying format (SDF) in which we save them for map use.
To convert your image to raster, switch off the Customizable icons (SDF sprite) option in the upload dialog:
![]()
Add watermark to map
Once uploaded, you can apply the watermark to your map:
-
Go to menu Layers and duplicate the
Backgroundlayer. -
Switch view from Blocks to Verticality. Both background layers are at the bottom.
-
Drag the
Background copylayer to the top and click on it. (You can also rename it toWatermark.) -
Go to section Fill and click on the Pattern field. Find the right set in the drop-down and select your watermark image.
-
Adjust Opacity of the layer (not the fill!) to make the watermark more subtle and translucent.
Next steps
When you’re happy with your map, save and publish it.